2014年12月29日
Chocolate Tempering: How To Temper Chocolate

Homemade Rocky Road, from The Great Book of Chocolate, Enrobed in Tempered Chocolate
How do you temper chocolate , and why do you do it? The short answer is that chemically, chocolate is composed of lots of different little crystals (six to be exact) but the desirable ones are called beta crystals. The development and formation of these beta crystals are what makes well-tempered chocolate.
If the cocoa butter rises to the surface, some people commonly think their chocolate has gotten moldy and toss it out. If you’ve done that, you’ve tossed out perfectly good, but unattractive, chocolate.

As you can see, there is a dull white sheen on the surface of this piece of chocolate. And that’s what happens to chocolate that’s not properly tempered: the cocoa fat rises to the surface and “blooms”, making it unappealing and unattractive. When you buy chocolate, like a candy bar or chocolate in bulk, the chocolate has been tempered and it should be nice and shiny and snap when you break it. Yet if you leave your candy bar in a warm car and later open it up, often it’ll become white and gray. The heat caused your chocolate to lose it’s temper. When you buy chocolate for baking, it should arrive well-tempered. (If buying pistoles in bulk, they may be dull from becoming scratched during transport, which is not to be confused with untempered.) But once you chop it up and melt it , the beta crystals change, the chocolate loses its temper, and you’ll need to re-temper it again if you plan to use it as a coating.
Pages and volumes of technical research have been written about tempering chocolate, but here are the main reasons for all you home cooks out there:
♥To avoid fat (and sugar) bloom, characterized by unappealing white streaks or blotches on the surface.
♥To raise the melting temperature of finished chocolate so it doesn’t melt on contact with your fingers.
♥To preserve the keeping quality of chocolate by stratifying the fat.
♥To cool chocolate quickly. Tempered chocolate cools fast, within 5 minutes.
♥Tempered chocolate will shrink slightly when cooled, which allows it to slip out of molds easily.
♥To give chocolate a glossy, shiny appearance, and a crisp, clean snap when you break it.
As I’ve said, you don’t need to temper chocolate if you’re going to bake a chocolate cake or make chocolate ice cream. The only time you need to temper chocolate is when you need an attractive, shiny coating for candies that will sit at room temperature . You can get around tempering by dipping chocolates in melted, untempered chocolate and storing them in the refrigerator. Just remove them from the refrigerator a few minutes prior to serving them. The coolness of the refrigerator will stratify the cocoa fat and it won’t bloom.

There are many different methods for tempering chocolate. Some are a bit complicated, and some are really messy, especially for home cooks. I rely on a thermometer, which is foolproof. It’s best to use a dark chocolate that is no higher than 70% in cocoa solids. Higher percentage chocolates (and some artisan bean-to-bar chocolates) can be quite acidic, and may behave differently.
I developed a simple 3-step method that’s a snap for home cooks. All you need is an accurate chocolate thermometer, although a good digital thermometer will work.
♥Tempering Chocolate
♥1. The first step is to melt the dark chocolate in a clean, dry bowl set over simmering water, to about 115º-120º F (46º-49ºC.)
♥2. Remove from heat and let it cool to the low 80ºs F (27ºC.) Drop a good-sized chunk of solid (and tempered) chocolate in, which provides insurance by ‘seeding’ the melted chocolate with good beta crystals. While cooling, stir frequently. Motion equals good crystallization, aka, tempering.
♥3. The last step is the most important: It’s bringing the chocolate up to the perfect temperature, where it’s chock-full of those great beta crystals. This occurs in most dark chocolates between 88° and 91° F (31º-32ºC.)
♥(Milk chocolate tempers at 86º-88ºF, 30º-31ºC. Please note that chocolates can vary, so check with manufacturer if unsure about your particular chocolate.)
♥4. Remove what’s left of the chunk of ‘seed’ chocolate, and your chocolate is dip-worthy: you can dip all the chocolates you want and all will be perfectly tempered. Don’t let it get above 91° F (32ºC) or you’ll have to begin the process all over again. If it drops below the temperatures, rewarm it gently to bring it back up.
For more chocolate tips, recipes, and information, check out The Great Book of Chocolate.

2014年12月03日
Dandelion Wine, Part 1
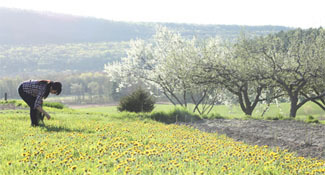
If you think making dandelion wine is all about meandering in a green meadow, gathering flowers under a mild morning sun while spring breezes tumble up the hillside to play in the bushes and trees, you’re right. There are some steps to take afterward of course, but if you do it right the recipe begins in a pastoral scene like this. That’s how my girlfriend Karol & I found ourselves last Sunday morning on a grassy Vermont hilltop, looking out at the Green Mountains and picking dandelions. We could have picked them anywhere, but the owners of the beautiful Orb Weaver Farm invited us to pick at their place, so that’s where we went. Recipes for dandelion wine say to pick the flowers away from polluted, trafficy areas. By extension I’m sure that the wine will taste better for having been born in a such a beautiful place.
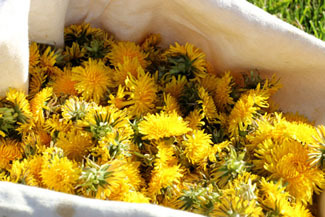
The idea to make dandelion wine was Karol’s. We were in Vermont at this time last year, and when she saw the yellow dandelions carpeting the ground everywhere she immediately thought of Edna Lewis, the great doyenne of southern cooking. Edna Lewis says, “the blossoms must be picked before noon. At midday they close up tight.” The basics of her recipe are: gather and clean the dandelion flowers ( “clean” means to pinch off as much of the green bracts as possible, leaving only the feathery yellow and white blossoms); pour boiling water over them and leave to steep for three days; strain, and add 3-1/2 pounds of sugar and leave to ferment for three weeks; strain again into jars and leave to ferment for 4 months. The flavor is said to be more like a liqueur or a sweet sherry. We’ll know what ours tastes like some time after Labor Day.

Today is day three. We’ll drain and sugar the wine tonight. The blossoms had to be transported to my Brooklyn kitchen from their Vermont meadow, and I hope the wine won’t suffer too much for it. When I poured boiling water over the dandelion flowers their buttery smell turned vegetal, like broccoli being steamed. After a day the odor mellowed and became grassy. On day two it became riper and sweeter and took on a fermented smell. Today the fermented smell is more pronounced. To me it smells earthy and full and pleasant. To Karol it smells like cat pee. Either way, I think it’s on its way to becoming wine.

I suppose it can be said that everything we humans eat compensates in some way for the fact that we can’t just eat sunlight like plants do. Instead we eat things that capture sunlight for us: leafy greens, fruits swelling up from the sun on their leaves, animal muscle built up by the sun-fed grass. In all my years of cooking, I’ve never handled anything quite so sun-like as those golden dandelion blossoms. When our first bottle of wine is uncorked under the chilly skies of autumn, I know that Sunday’s warm spring sun will come back to me.


